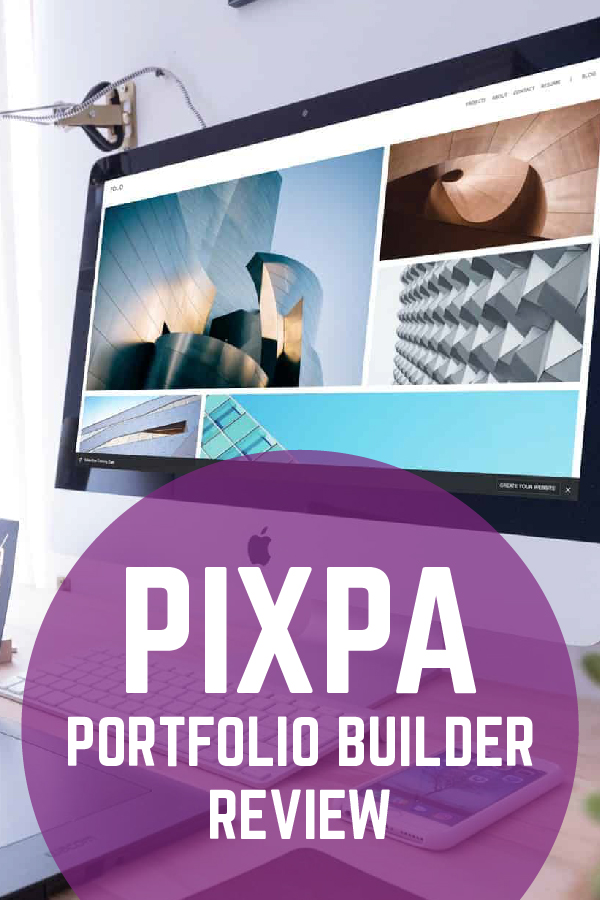
Thinking about using Pixpa to build a portfolio website? In this post we review the pros and cons. When it comes to websites, designers, photographers, artists, and creatives all have one thing in common — their portfolios are the lifeblood of their work. A great portfolio can separate you from the rest of the crowd.
Pixpa allows you to quickly create a professional-looking website. Unlike other builders, it’s specifically built for creatives. It’s easy to use even if you have no coding knowledge.
Bonus: Use code “dailylogochallenge10” for a 10% discount on your first year of the service.
Pixpa is an online platform that promises to help you design attention-grabbing portfolios with no coding experience required. Moreover, they say they can help you to create stunning e-commerce stores too.
In fact, the platform already has thousands of users.
But are their claims all that they’re cracked up to be?
We’ve tested the platform to create a few websites of our own. Here’s what we found out.
The Basics
Who’ll Use It?
What Does It Cost?
The Key Features
Pros
Cons
Final Thoughts
Pixpa combines portfolio website building with e-commerce and a bunch of themes. It uses your choices to create a website that you can use to attract new clients.
Importantly, it takes all the coding out of the process. Instead, Pixpa lets you play with your website’s settings using a bunch of tools.
Anybody who works in a creative profession may find that Pixpa provides them with some useful tools. With Pixpa, it’s all about presenting your creative talents in an attractive way.
Moreover, it may make a great choice for those who run a small e-commerce shop. Pixpa applies its creative focus to your store, making it more attractive for consumers.
Pixpa offers four membership tiers:
Use code “dailylogochallenge10” for a 10% discount on your first year of the service!
Each package offers you a choice of annual or rolling monthly payments. If you choose the latter, you’ll pay a little extra each month. However, you have the option to cancel your membership at any time.
The good thing is that every package offers you what you need to build a portfolio or online store. “Lite” lets you create a website with as many pages as you want, but it places some limits on your work. It’s not suitable for e-commerce because it only gives you three product pages per website.
You can also upload only 200 images or videos. That may sound like a lot until you hit the limit. Your portfolio ends up half-completed, so you’ll probably end up upgrading.
The higher packages offer more, with everything from “Starter” upwards giving you unlimited images.
You also get cloud storage options, ranging from 1GB with “Lite” to up to 25GB with “Plus”. The higher packages also let you place more products in an e-commerce store and comes with a few other bells and whistles, such as inventory management.
You don’t have to jump right in either. Pixpa offers a 15-day free trial, for which you don’t need a credit card to sign up. That should give you a feel for the sort of websites it can create.
We think that the package you choose should depend on your needs. Artists and designers looking to build simple portfolios may find everything they need in the “Starter” or “Pro” package. The “Plus” package is best if you have a large online store, while “Lite” works as a nice introduction to the platform.
You’re taken into a wizard as soon as you log in to Pixpa for the first time. This little online tour takes you through the platform’s key features, which are all listed on a navigation bar at the top of the page.
They include the following:
The main dashboard also offers a few options, mostly revolving around creating your website and adding to your store. However, you can also use it to share your site with others and to create a blog.
It’s all very detailed, so we’re going to keep it simple in this review. Let’s look at the five main features we’ve listed above and how they combine to create a website.
The Design area is where you’ll create the basic theme for your website. A big button takes you to a selection of 36 varied themes.
Here you should be able to find something that suits your website’s style. But Pixpa also adds new themes regularly. A quick click and you apply the theme.

Then it’s onto the rest of the design. The first stop is the Logo area, where you can upload a company logo and Favicon for your website. You can also play around with the site’s title’s font and color.
The sample site design on the right refreshes with every change you make, so you can see the effects of your decisions in real-time.
The rest of the options involve changing the colors and styles used throughout various portions of the site. You can customize the background, header, and footer. It even allows you to change the hover over color when somebody moves their cursor over an image.
Once you’re done, you just click the Publish Style button to make your changes live. You can then view what the website looks like using the “eye” icon in the top-right of the page.
It’s all really simple and the platform shows you how each change you make affects the design. We particularly like how these customization options allow you to personalize your theme.
With the design sorted, it’s time to move on to the content. That’s where the Website option comes into play.
It’s here where you’ll manage the website’s navigation system. Plus, this is where you’ll upload new images to your portfolios and new articles to your blog. Naturally, you can edit all of this as needed.
Your theme will give you a few menu items, which are listed down the left-hand side. Clicking the cog next to an item allows you to change its name, while clicking on the item itself allows you to play with the content. You can also add new menu items using the “+” symbol in the top-left corner.
The galleries really impressed us. Not only can you add and delete images quickly, but you can manage everything about each gallery. You can change the order of the pictures, make some inactive, and even add captions.
Clicking on each image also allows you to add keywords and a description to it.
It’s quite an involved process and can take a little getting used to. However, we also appreciate this level of detail and control.
There’s also space to add your biography and contact details, plus you can manage your blog posts in this section. The Store option brings up the store’s settings, but there’s a separate area for managing its content that we’ll get to in a little while.
The key here is that the platform gives you all of the tools you need to customize your website content while keeping things simple. You’ll have to experiment a little to get it all right, but it’s certainly a lot easier than coding.
It’s in this section that you’ll handle all of the particulars of your online store.
The initial dashboard image presents you with several key stats. These include how much you’ve sold over certain time periods and how many products you have on your site. We really like that it tells you how many products you have out of stock too, as this really streamlines your stock ordering processes.
It all gets a bit more complicated from there. You can do everything from creating new categories and adding new products, to tracking orders and setting payment methods. It’s all self-explanatory, but it will probably take an hour or two to get everything set up as you want it.
Adding a product is quite simple though. Clicking the “Add a Product” button takes you to a wizard where you choose between physical, digital, and service-based products.
From there, you can upload images, add descriptions, and even turn on a stock tracker if you have one of the more expensive packages.
Again, it takes a bit of experimentation, but there’s nothing too difficult going on here. Plus, there are links to several help articles dotted around if you do get stuck.
Now this is an interesting and oddly named feature. Proofing allows you to create restricted galleries and online stores that you only make available to certain clients.
It’s pretty simple. Just click the wizard and you can name and select the layout of your gallery. It then appears on the Proofing dashboard so you can start playing around with it.
Clicking the image allows you to alter the gallery as you would on the Website page. However, there’s also a little cog attached to each gallery that you can use to access the settings. It’s here that you can create a password for the gallery, which you can then distribute to whoever needs it.
It’s a nice little feature that we think may prove useful if you’re creating client-specific presentations. However, most probably won’t find much use for it.
Pixpa offers live chat (though not 24 hours a day), email, and ticketing options for customers needing support. They do not offer phone support. They also have a great knowledge base that covers most questions you may have. If your website looks like it is down you can also check their status page that is updated every five minutes.
This is where you’ll mess with the base settings of the site. You can change the site’s location and the currencies attached to any products you sell. You can even add a Google Analytics code, so you can keep track of all activity on the site.
The navigation bar down the left-hand side lets you customize some social media options and handle some basic search engine optimization (SEO).
We also like how you can connect a domain name that you own to the site you create. In fact, we think it’s essential because the default name you get contains the Pixpa name.
Again, it’s all comprehensive enough to allow you to avoid that dreaded coding. You can even create redirects from old website pages to your new Pixpa pages.
The only issue we have is that there doesn’t appear to be a way to change the language for the back-end. You can handle the on-site language easily enough, but you may find it difficult to navigate through all of your page’s settings if you struggle with reading English.
So far we’ve covered most of what you need to know about Pixpa. It can get even more in-depth if you want it, though. For example, you can add watermarks to images and create default messages to send to clients when something happens with their orders.
The key question is: does Pixpa create good websites?
The answer is yes, assuming you want an image-heavy site. Pixpa creates clear and engaging websites with a focus on gallery images. That’s just what you want as a designer, but it may not be quite so good for anybody looking for a content-heavy website.
Pixpa may be one of the most detailed website builders that we’ve come across. It keeps its promise of taking all of the coding out of your hands. Plus, you get a great website out of your efforts.
It does take some experimentation, as there’s a lot going on here. But that also offers you a huge amount of control. If you don’t think it’s a great fit we have an entire list of portfolio website builders that might be a better choice for your business.
We recommend giving the free trial a crack to see what you think. In a day or two, you’ll create a website that looks as professional as anything else on the web.